Checking tasks with your own script
If the programming task architecture doesn't suit you, you can configure the system's behavior in Yandex Contest when receiving solutions from users. Create a problem where the user has to implement a specific function. You can assign a specific number of points to the problem. To check an answer, use the unit testing system built into the language.
To set system behavior when receiving a submission, you can use the make compiler. In this case, behavior is determined by the configuration file Makefile.
Using this behavior, you can run non-docker compilers that are available in the system. Here's an example using the Python3 interpreter.
1. Configure compilation
Compilation settings are used to prepare submissions for launch. Every programming language has a compilation stage in Yandex Contest, even interpreted languages. However, in this case, nothing is performed for most compilers.
To prepare the user's file for running tests:
-
Create a Makefile in the root for the problem files:
all: build

build:
    /bin/sh ./build.sh
run:
    /bin/sh ./run.sh
The script tells the system to execute the
./build.shscript at the build compilation stage and execute the./run.shscript at the run stage when running a user solution and launching checkers.Alert
Indents before and inside the build and run functions should be tabs rather than spaces. Otherwise, you'll get an error when running the compiled problem:
CE Makefile:4: *** missing separator. Stop. -
Create the build.sh script and place it in the root for the problem files, just like for the Makefile:
#!/bin/bash

OUT=participantSolution.py
TMP=tempNameForParticipantSolution.py

cat $filename > $TMP || exit 1
rm $filename
cat $TMP > $OUT || exit 1
The participant's submission code is placed in a file on the server where it will be executed. The name of the file with the user code is contained in the variable
$filename.In this script, you transfer the contents of the user solution to a file with a name you'll definitely know. This makes it easier to access this file in the following scripts. The contents are moved through a TMP file, so the files will not be lost if the participant sends one with the same name as the value in the variable OUT.
Note
The file names may differ. You can specify names that are better for you.
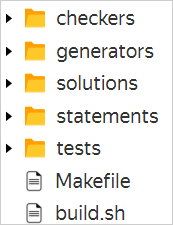
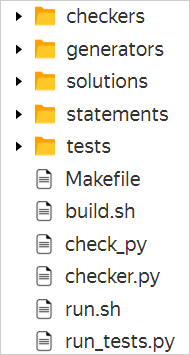
The result has the following file structure:
-
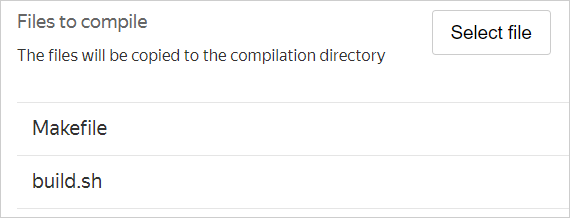
Open the Problems section. Under Additional files and processing, add the created files to Files to compile.
Warning
First add Makefile, then build.sh.
2. Configure the run time
At the run time stage, the prepared user code is run according to specific rules. The checker is also run at this stage. The checker and user's solution are run as many times as there are tests in the test sets.
Use this stage to run standard Python tests and estimate them with a prechecker.
-
Create a run.sh file in the root for the problem files. This script is called in Makefile:
#!/bin/bash

python3 run_tests.py
In this script, you run a Python script for running tests.
-
In the root for the problem files, create a run_tests.py file with a Python script. Specify the tests in it and run them:
#!/usr/bin/env python # coding: utf-8 import unittest import io from participantSolution import participantSolution # method import ? def get_basic_score(log): score = 0.0 test_scores = { 'test_first': 0.5, 'test_second': 1.0 } for line in log.strip().split('\n'): line = line.strip().split() if not line: continue if line[-1] == 'ok': score += test_scores[line[0]] return score class SampleTestSuite(unittest.TestCase): def test_first(self): result = participantSolution(123, 321) self.assertEqual(result, 444) def test_second(self): result = participantSolution(1, 5) self.assertEqual(result, 6) # Create an output stream. You will need it to receive and process information from the testrunner string_io = io.StringIO() # Create a suite and launch it. Output the result to the output stream from the last step suite = unittest.TestLoader().loadTestsFromTestCase(SampleTestSuite) runner = unittest.TextTestRunner(verbosity=2, stream=string_io).run(suite) # Run the standard output stream processing function score_basic = get_basic_score(string_io.getvalue()) # Output to stdout the full log of the user's submission print (string_io.getvalue()) # Output the points scored by the user to stdout. This value will be passed to the checker # If just passing the tests is enough, you can output, for example, OK/FAIL print(score_basic)- The
get_basic_scoremethod can be used to process the console output of theunittestmodule. - The
SampleTestSuiteclass contains the tests in the format required for theunittestmodule.
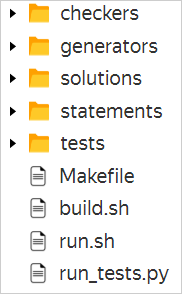
The result has the following file structure:
- The
-
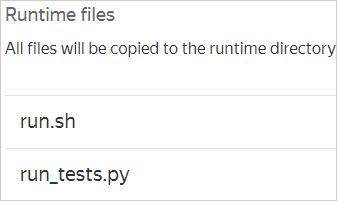
Open the Problems section. In Additional files and processing, add the created files to Runtime files.
Alert
First add run.sh, then run_tests.py.
3. Configure the checker
The checkers are launched each time the user's solution file is executed and analyze the output in stdin at the runtime stage. Standard checkers work with data from test files and read text from the test's answer file.
In this example, ignore what is specified in the test file and focus only on the code output in stdin at the solution launch stage. This is why you need to implement your own checkers. For more information about creating checkers, see Settings. Let's look at a checker:
-
Create a check_py file in the root for the problem files:
#!/bin/sh

/usr/bin/python3 checker.py $1 $2 $3
In this file, you call a checker in Python and pass three arguments. These are the paths to the files with input (test file), output (output of the user's solution at the run stage) and answer (expected answer of the test file).
-
Create a checker.py file in the root for the problem files:
import sys
import datetime

if __name__ == '__main__':
    stdout_file = sys.argv[2]

    with open(stdout_file) as f:
        lines = f.readlines()
        last_line = lines[-1].strip().split()
        basic_score = float(last_line[0])
        if basic_score == 0.0:
            print ('Wrong answer!')
            sys.exit(1)
        else:
            print (basic_score)
The script reads the file passed in the second argument and finds its last line. It contains points awarded by the program with the tests. If the solution received 0 points, the script outputs text saying that the solution is incorrect and terminates the checker program with
exitcode 1.The
exitcodevalue determines the verdict that Yandex Contest assigns to the user's submission. For example, 0 is OK, 1 is WA, and 2 is PE.The verdict depends on the
exitcodevalue as well as the checker type selected in the problem settings. Let's look at the TESTLIB_EXITCODE_CHECKER checker type.The result has the following file structure:
-
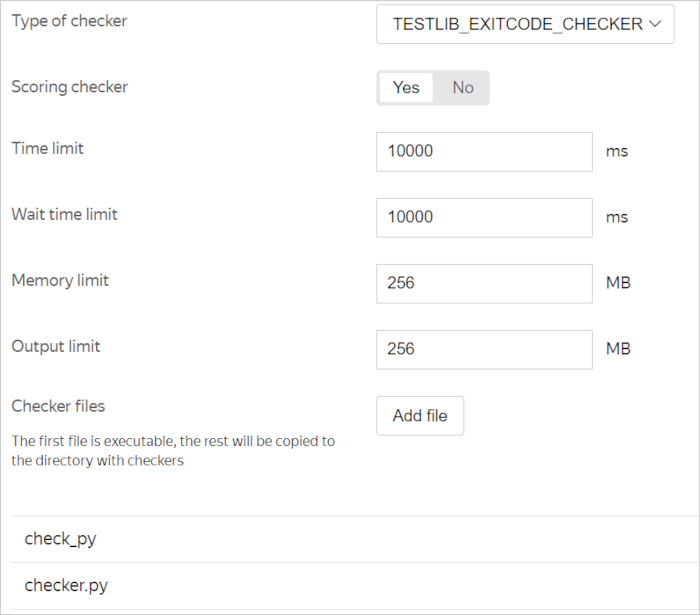
Open the Problems section. In Checker settings, specify:
- Type of checker: TESTLIB_EXITCODE_CHECKER.
- Scoring checker: YES.
- Checker files: First add check_py, then checker.py.
The resulting checker settings look like this:
4. Create a test file
Although test files are not used during launch, it is important to create a test file and make sure it is added to the test set.
The system needs the test file and test set to know how many times it should run the user code. Test sets are also used in contest settings to see what data to display to participants on the submission page.
For our example, you can create an empty test file tests/01 and an empty answer file tests/01.a.
5. Check the result
Create a file of the solution with the code:
def participantSolution(a, b):
    return a + b
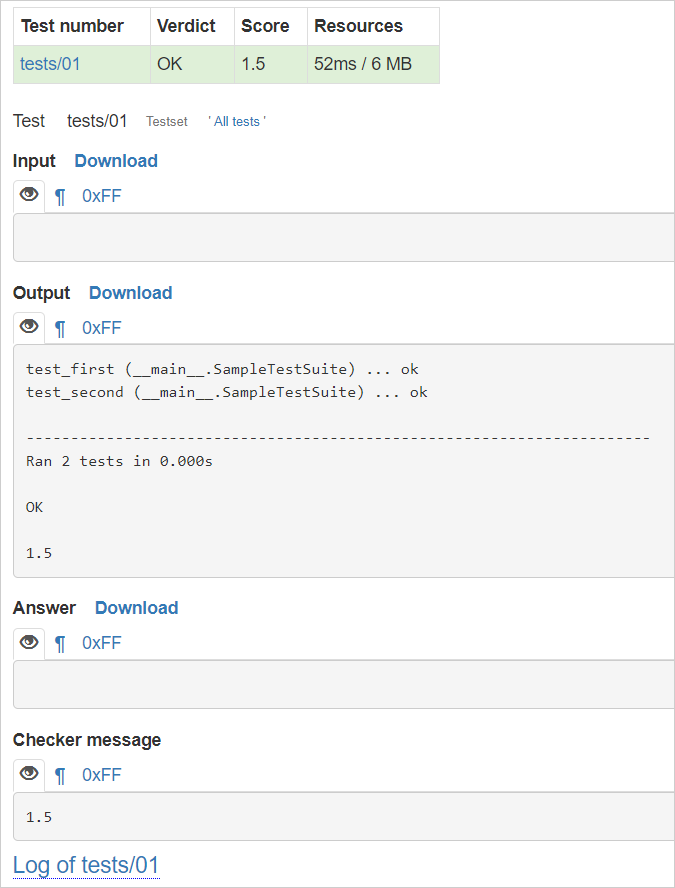
If you did everything right, the submission page with this solution should look like this: